Vinyl plank flooring is a popular choice for many homeowners due to its durability, versatility, and cost-effectiveness. However, like any flooring material, vinyl planks can sometimes become damaged, especially near high-traffic areas or walls. Replacing a damaged vinyl plank next to a wall might seem like a daunting task, but it’s actually a simple and rewarding DIY project. In this guide, we’ll show you how to replace that damaged vinyl plank with ease, ensuring that your floor looks as good as new.
Why You Should Replace a Damaged Vinyl Plank Next to a Wall
Vinyl plank flooring is not only affordable but also highly durable. However, damage can still occur over time. A damaged plank next to a wall can disrupt the aesthetic of the entire room and potentially worsen over time if not addressed. Instead of living with an unsightly or damaged section, replacing the plank can restore your floor’s appearance and functionality, helping to maintain your home’s overall value and appeal.
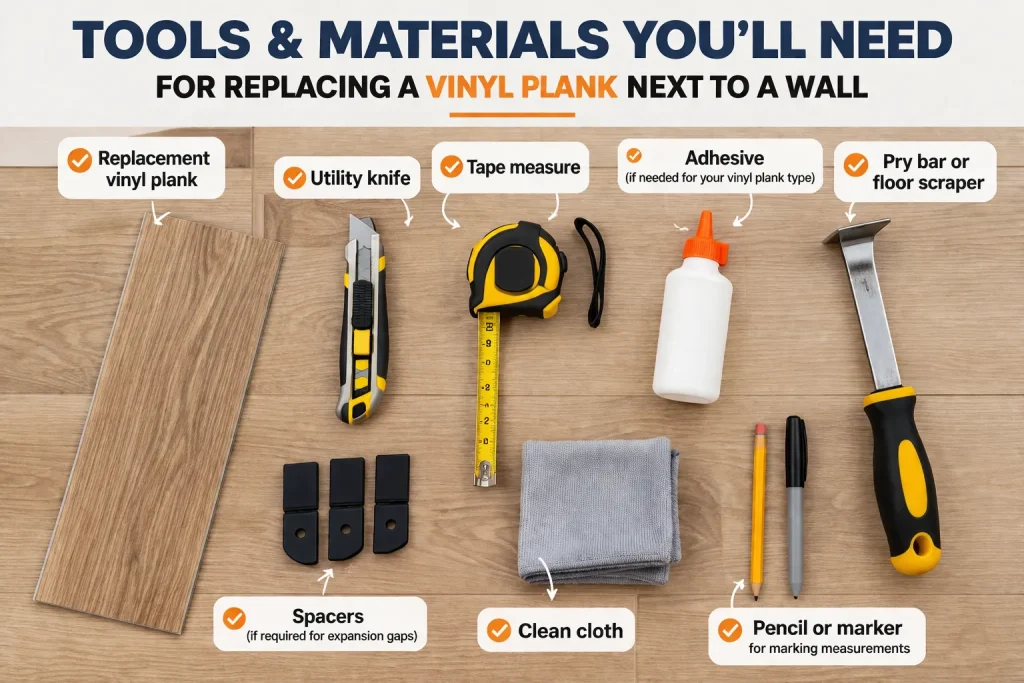
Tools and Materials Needed for the Job
Before you begin, make sure you have all the necessary tools and materials ready. Having everything at hand will make the process smoother and quicker. Here’s a list of what you’ll need:
- Replacement vinyl plank
- Utility knife
- Tape measure
- Adhesive (if needed for your vinyl plank type)
- Pry bar or floor scraper
- Spacers (if required for expansion gaps)
- Clean cloth
- Pencil or marker for marking measurements
 Step 1: Preparing the Area
Before you start removing the damaged vinyl plank, it’s essential to prepare the area around it. Clear the space of any furniture, rugs, or obstacles. If the damaged plank is near a wall, ensure there is enough room to work comfortably. It’s also a good idea to sweep or vacuum the area to remove dirt and debris that could interfere with the process.
Step 2: Removing the Damaged Vinyl Plank
To replace a vinyl plank next to a wall, the first step is to remove the damaged one. If your vinyl planks are click-lock, you will need to gently lift and separate the damaged plank from the adjacent ones. Start by using a utility knife to cut along the edges of the plank, making sure you don’t damage the surrounding planks. If you have trouble removing the plank, use a pry bar or floor scraper to help lift it up carefully.
If your floor is glued down, you will need to soften the adhesive first. A heat gun or hairdryer can be used to loosen the glue, making it easier to remove the damaged plank. Once the plank is free from the adhesive, you can lift it off and set it aside.
Step 3: Preparing the Subfloor
Once the damaged plank is removed, it’s crucial to inspect the subfloor for any debris, dirt, or damage. Clean the area thoroughly before proceeding. If there’s any residual adhesive from the old plank, use a floor scraper or adhesive remover to clear it away.
If the subfloor is uneven or damaged, you may need to repair it before installing the new vinyl plank. Make sure the surface is flat, smooth, and dry before moving on.
Step 4: Measuring and Cutting the New Vinyl Plank
The next step is to measure the space where the new plank will go. Using your tape measure, carefully measure the length and width of the gap, paying special attention to the distance between the edge of the wall and the adjacent planks. Mark your measurements on the new vinyl plank.
Once you have your measurements, use a utility knife to score the plank along the marked lines. After scoring, carefully snap the plank along the scored line. If necessary, use a saw for a cleaner cut. Make sure the new plank fits snugly into the space, leaving a small expansion gap (typically around 1/8 inch) between the edge of the plank and the wall. This allows for any expansion and contraction due to temperature changes.
Step 5: Installing the New Vinyl Plank
Now that your new vinyl plank is cut to size, it’s time to install it. If your planks are click-lock, simply insert the tongue of the new plank into the groove of the adjacent plank, ensuring the edges align properly. Gently press down to secure the plank in place.
If your vinyl plank requires adhesive, apply a thin layer of adhesive to the subfloor. Be sure to follow the manufacturer’s instructions for the best results. After applying the adhesive, carefully place the new plank into position and press it down firmly. Make sure the plank is aligned with the other planks, and use spacers along the wall if necessary to maintain the expansion gap.
Step 6: Sealing the Edges
Once the new vinyl plank is in place, you’ll need to seal the edges to ensure a clean and professional finish. If your planks are glued down, this may already be done during the installation process. For click-lock planks, the edges may need to be sealed with a vinyl floor seam sealer or a similar product to prevent dirt and moisture from seeping underneath.
Apply the seam sealer carefully along the edges, wiping away any excess with a clean cloth. This will help protect the edges of the plank and ensure that it stays in place for years to come.
Step 7: Cleaning and Final Touches
After the installation is complete, give the area a thorough cleaning. Use a damp cloth to wipe away any adhesive residue or dust from the surrounding planks. If you used spacers to maintain the expansion gap, remove them once the adhesive has dried and the plank is securely in place.
Inspect the new plank to make sure it is properly aligned with the surrounding planks, and ensure there are no gaps or misalignments.
Conclusion
Replacing a damaged vinyl plank next to a wall might seem like a challenging task, but with the right tools and a little patience, it’s a project you can easily tackle yourself. Not only will replacing the plank restore the beauty of your floor, but it will also help maintain the integrity of your vinyl flooring. By following the steps outlined in this guide, you can replace the damaged plank with confidence and enjoy a perfectly restored floor.


